


Customer Birthday Discount
Available in: USA
Powering Up the Device
Pairing Your Device
Supported Connection Type: Wifi | Ethernet (with adapter)
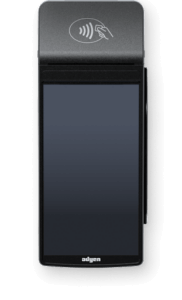
The P5 device is a wireless countertop reader for ThriftCart Payments. This state-of-the-art card reader accepts chip, contactless NFC, or swipe and the attached thermal receipt printer makes taking transactions easier than ever. Our credit card readers are plug-and-play – Simply connect it to your local Wi-Fi network, enter the pairing code in ThriftCart POS, and start taking payments in minutes. The P5 device is also low-maintenance with no additional upkeep required. Updates happen automatically at night using the wifi network so no interruptions and no hassle. To view the reader’s parts and features, see the Wiseasy P5 product sheet.
Powering Up the Device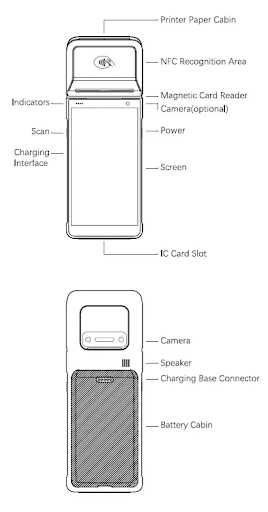
When you first receive the device the device should come partially powered up. Use the USB-C wall charger (not a USB computer port) to begin charging the device to full power. Once charged, hold down the power button on the right hand side until the screen turns on. Once the device is powered on, pressing the power button once will sleep and wake the device. To fully power off the device hold down the power button until the power off option is shown on the screen, then select it.
If you need to replace the battery, lift up from the indentation at the bottom center of the back cover to detach it from the device.
Note: If the reader won’t charge or you want it to charge more quickly, be sure to plug it into a wall charger and not a computer USB port.
Note: If powered down, try to turn on the reader about 30 minutes before you’re open for customers in case there are updates to be installed.
Connecting to Your Wifi
- Once the device is powered on, an Android loading screen may display.
- Unlock the device by using your finger to swipe from the bottom of the screen to the top of the screen.
- The screen may prompt to connect to WiFi, but if it doesn’t, click on the Settings app. If the settings app is not displayed, swipe up from the bottom again to show the device applications.
- Click on the ‘Settings’ app, navigate to ‘Network & Internet’, and choose WiFi. Make sure it is toggled on.
- Select the WiFi network and enter your network details. It has to be password protected, and once the password is in, it should say connected under the network name.
Note: Your WiFi network must use WPA-Personal or WPA2-Personal encryption and be password protected. WiFi is not supported for non-password-protected networks or enterprise networks.
Connecting to Ethernet
Note: an Ethernet adapter like this is needed to connect an Ethernet cable to the reader.
- Once the device is powered on, unlock the device by using your finger to swipe from the bottom of the screen to the top of the screen.
- Once on the Home screen, repeat this process by swiping up again to show the device applications.
- Click on the ‘Settings’ app and navigate to ‘Network & Internet’.
- At the top of the screen, press the ‘Ethernet’ button.
- Turn the button ON to enable it.
- Then press the central circle button at the bottom of the screen to exit the ‘Settings’ page.
Pairing Your Device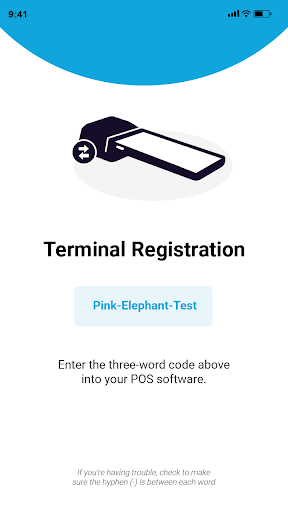
Once the device is powered up and connected to Wi-Fi, at the bottom middle of the screen tap the circle button.
On this screen select the “Quilt P5” terminal app. (This is the app that has to be running to process transactions.)
At first, it should display a three-word pairing code to enter into ThriftCart POS.
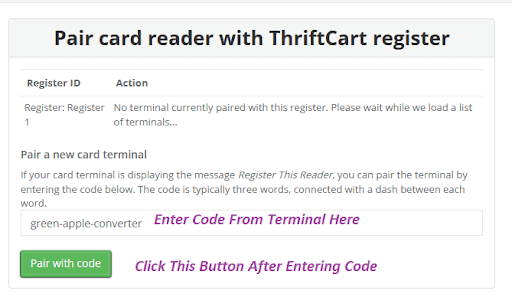
Login your ThriftCart POS account, and on the left menu, click Point of Sale and Inventory -> POS Settings.
Then Click ThriftCart Pay Terminal Management.
If it prompts you to select a register ID or location, pick the appropriate register ID or location.
After doing so, you should see a box where you can input the pairing code displayed on the device (the three random words).
Enter the pairing code in the box similar to that pictured below, and press Pair With Code:
The terminal should pair itself with ThriftCart, and you should see a message indicating the serial number of the terminal you just paired.
Now you need to pick which register to associate the terminal with (even if you have only one register, this is still a required step.)
Select the serial number from the drop down in the appropriate register, and click Pair This Reader To This Register. (You might pair one at a time so you only have one option.)
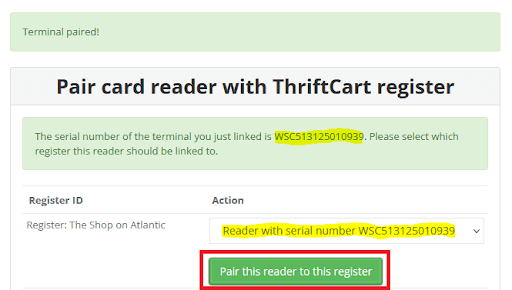
Your card reader should now be paired and ready for running sales!
If you attempt a sale transaction and don’t see a donation prompt displayed on the reader screen, please visit your thriftcartpay.com account and look for donation prompt settings or contact us for assistance.


With three years in the thrift industry during a pivotal shift to omnichannel selling, Kyle Payton helps stores better manage inventory and forecast product needs. As General Manager at ThriftCart, he focuses on equipping nonprofit thrift operations with point of sale technology that makes their day-to-day operations easier.
Kyle's passion lies in helping thrift store managers embrace digital solutions that support their unique mission and maximize their impact in the community.
"Supporting nonprofits is incredibly rewarding. I’m here to provide thrift store managers with the tools they need to thrive, so they can continue making a positive difference in their communities."